ZimmWriter – The Definitive 5 Star Review Guide | Coupon Code Worth $15
ZimmWriter is an AI Content Writing tool that can be used anywhere on your Windows or Mac PC and allows you to scale content writing by creating 4000-6000 word outputs in minutes!
ZimmWriter Discount and Discount
In this in-depth review we will cover the pros and cons of using this software, in addition to taking a look at how it stacks up against other AI Content Writing tools like Chat GPT and Jarvis. If you’re just looking for a ZimmWriter promotion code, you can find it here!
Let’s jump right in!
What is ZimmWriter
ZimmWriter is an Ai Content Writing tool that utilizes OpenAI’s most recent text-davinci-003 GPT3 model to generate written content quickly and effectively that is able to avoid most AI detectors.
This makes it an ideal option for marketers, SEOs and other content driven professions where generating blogs, text, and copy are heavily relied on.
ZimmWriter Features, Functionality and UI/UX
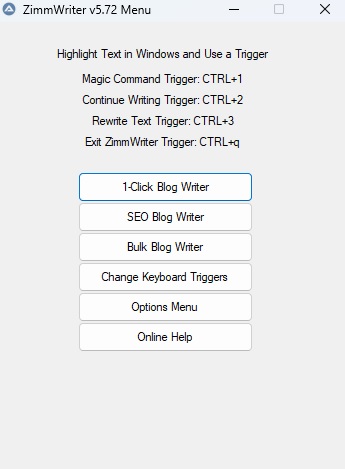
When looking to understand the features and functionality of ZimmWriter, we only need to look to one panel!
After installation and launch of the program, you will be met with this one screen, to rule them all! In addition to these options, you can also use ZimmWriters magic keys from anywhere inside windows!
That’s right, whether you’re sending a LinkedIn message, composing a new e-mail, creating a blog outline in a Word Document or need a conclusion to your blog, ZimmWriter can be used anywhere in Windows or Mac!
Riding on the heels of it’s application of use, ZimmWriters interface is great for users of all technical levels and can be easily learned by anyone who has a passion for content creation.
Some of the main features include:
1- Click Blog Writer
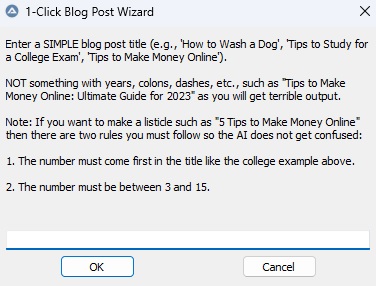
The one click blog writer is exactly that. For all of you out there who hate using Chat GPT’s “Continue” function, this will be proverbial music to your ears. Are you ready…. The program takes a minimal prompt with this feature and turns it into an article that comes in at more than 4,000 words, with multiple heading sections.
Pretty neat right? This alone has the power to maximize your efficiency in how quickly and often you can produce content!
But it doesn’t stop there! Especially for those of you who want to optimize your blog writing beyond a singular input!
SEO Blog Writer
Think the one click blog writer was revolutionary? Hold on, because this is where things start to get interesting with ZimmWriter!
With the SEO Blog Writer at your disposal, you can create long-form SEO optimized blog posts in as little as 60 seconds after selecting the features that you want included in your output!
By following the steps outlined below you can get great results that pass AI Detectors, as mentioned above:
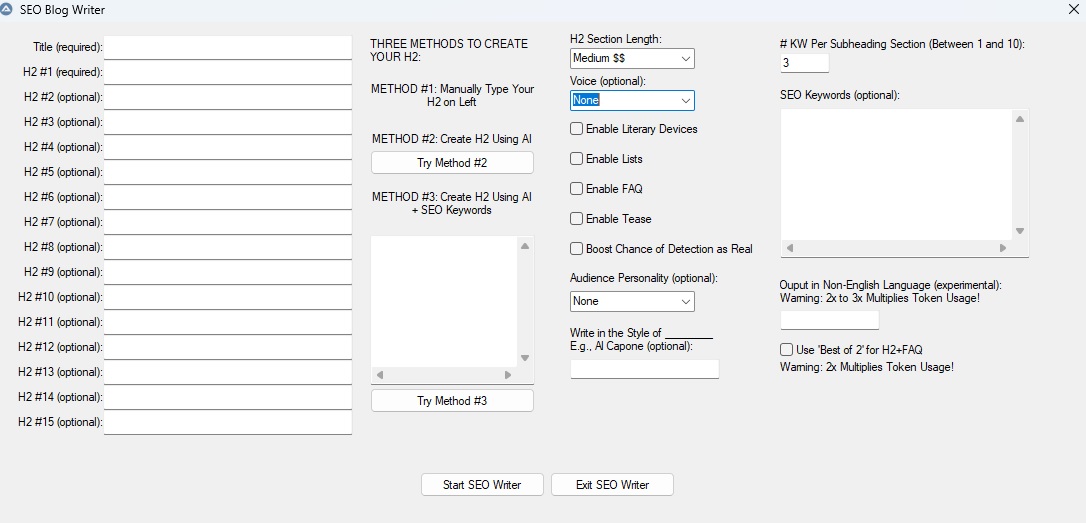
1. Input your H1 Title and H2 Headings
When entering your titles and headings there are multiple ways to generate them!
- Method Number 1: allows you to manually enter all of your titles into ZimmWriter
- Method Number 2: allows you to create your H2’s after imputing your title with OpenAI
- Method Number 3: allows you to enter keywords into the free-form text field and ZimmWriter will generate your titles based on the keywords, similar to method number 2
2. Select From The Following Options For Your Output
- H2 Section Length: Allows you to select from a drop down of options that generates different output lengths underneath your H2 headlines. The options are “Short”, “Medium” and “Long”
- Voice: With the voice drop down you can choose from three options being “Very Personal”, “Personal”, and “Professional”. Note: We have found that using personal or very personal allows for the best chance of passing AI Detectors.
- Enable Literary Devices: This option allows you to enable English driven Literary Devices that make the text feel, sound and look more human. Enabling this section can also help with the chance of beating AI Detectors.
- Enable Lists: Enabling lists does exactly that! When ticked, you can expect ZimmWriter to create bulletined lists of information in your blog outputs.
- Enable FAQ: Enabling the FAQ option creates a Frequently Asked Question section at the end of your blog or article with commonly asked questions that pertain to it’s topic.
- Enable Tease: Enabling the tease option in the program allows for smoother transitional structure between paragraphs, and sections of the content.
- Boost Chance of Detection As Real: With the following option, ZimMWriter uses a computation to boost the outputs chance of fooling AI detection, which we highly recommend!
- Audience Personality: When this option is enabled you can choose the intended audience for the article based on “Brand Archetypes”.
- Write In The Style Of: This feature allows you to create an ouput that is written in the literary voice or style of a person. We recommend using famous people, celebrities, musicians or actors!
- Keywords Per Subheading Section: This option allows you to instruct the AI on how many keywords should be used in each subheadings (H2’s).
- Output In Non-English Language (Experimental): With this feature, you can attempt to have the AI create a non-english based output. Note, we have tested this in German, Polish and Danish with varying degrees of success~
- Use Best of 2: If you enable this option, the AI will write all subheadings twice and pick the best one as the output in your blog or article Please note that this option makes the article’s price twice as high (we are still talking about very low cost here.)
3. Add SEO Keywords
With the add keywords section you can paste up to 150 keywords in ZimmWriter at one time. When used properly, the produced AI Content will craft your article in a way that uses the keywords provided at a proportionally dense rate to help optimize the output for search engines.
Please note, even with the use of SEO Keywords you should be editing the article or blog to make sure that the keywords were not over or under-used for the amount of text generated.
Tip: A great way to understand how many times keywords should appear in any document is to look to the top 3 results in Google for the keyword of choice and average the density used on the pages. This gives you a baseline for understanding what the optimal density or structure should be.
In our experience the SEO Blog writer is a fantastic tool to jump-start content creation, especially in the hands of willing and capable Search Engine Optimizers!
Bulk Blog Writer
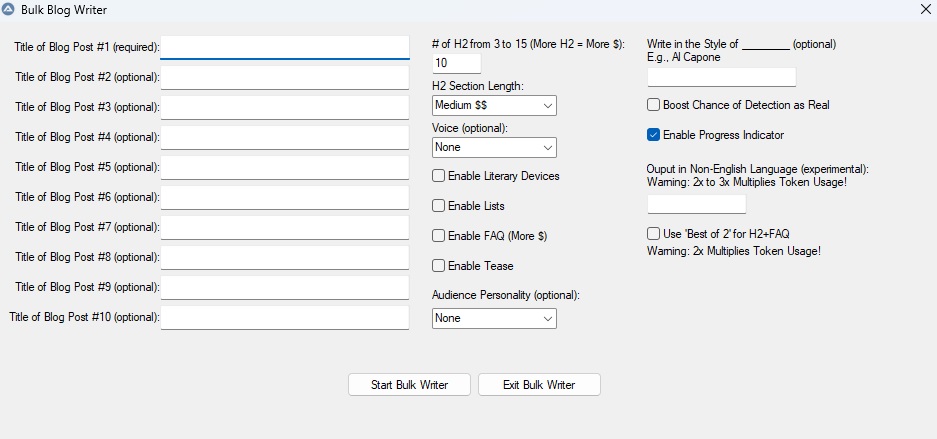
As mentioned above if your current goal is to get out as much content as humanly possible, then this will be your go to feature on ZimmWriter Windows, and possibly even the first love of your life (Don’t tell your wife)!
With this feature you can generate multiple blogs at once with minimal prompting through the use of topic headings or blog titles, and well, that’s it!
The program continues to run in the background while you head over to your favorite SEO Group like Google SEO Mastermind to post your awesome results from previous work, and by the time you’re done showing off your sites 90 degree graph incline from your new found tool, you have already generated more content!
Similar to the SEO Blog Writer the specific features include:
- Specify up to 10 different article titles and it will bulk write 10 articles at a time in the background while you go do other things in life
- Includes a customizable # of subheadings
- Includes 12 Brand Personality Types
- Includes +600 Literary Devices
- Includes a Make it Personal option
- Includes FAQ generation
- Includes next paragraph teaser
- Includes an optional BestOf2 boost mode
ZimmWriter Pricing
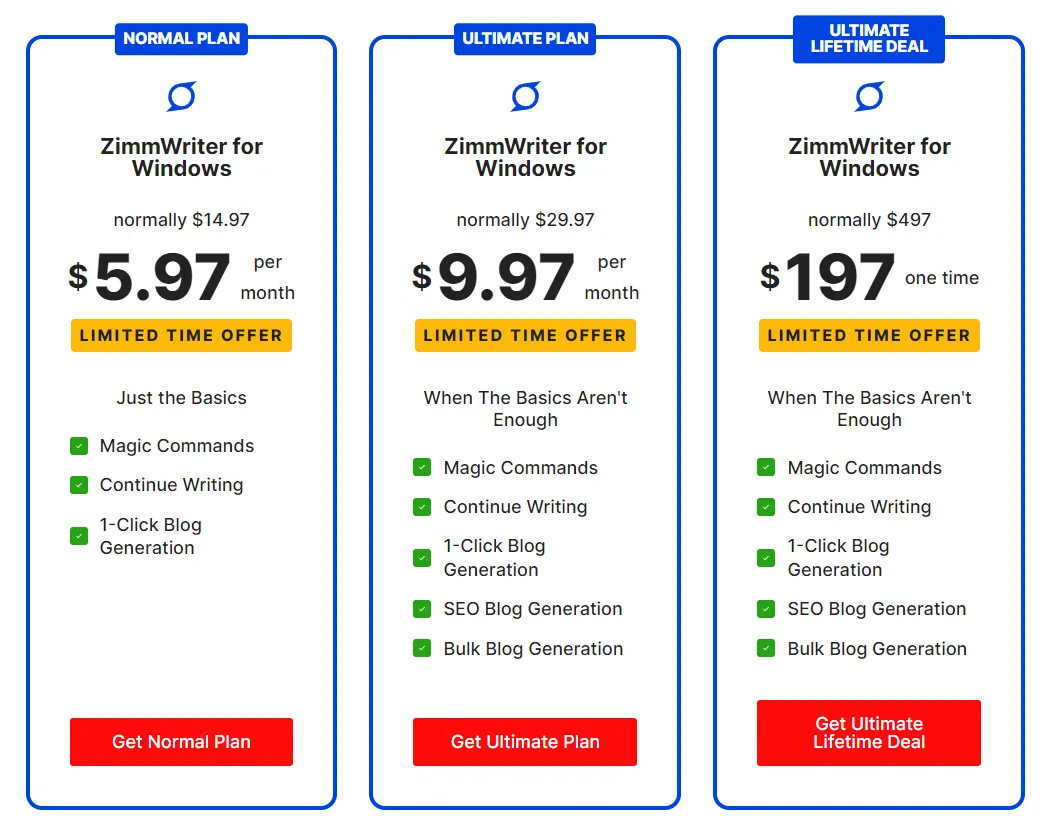
Currently ZimmWriter has three pricing plans. Those plans are Normal, Ultimate, and Ultimate Lifetime, with the normal plan not including the SEO and Bulk blog generation features, and the Ultimate plans include all the features.
Coupon Code and Discount for ZimmWriter
If you’re looking to save money on ZimmWriter, look no further! We’ve gone ahead and done the work for you to help you save money when downloading the lifetime deal of this program!
This coupon code gets you exactly $15 off the lifetime deal per purchase, bringing to the total cost of ZimmWriter from $197 down to $182, which we still feel like is a under-priced cost point for such a great tool!
Click Here to Get The ZimmWriter Discount
How To Download and Install ZimmWriter for Windows
Looking to install ZimmWriter for Windows on your local machine? Here’s a step by step guide!
- After downloading the files you will need to unzip the package or extract the archive
- Next, there will be a batch file called “Start” in the folder you have downloaded. Double click this file or run it
- At this point you will be prompted by multiple screens for a licensing key for the software and an API key for OpenAI. The licensing key will be sent to the email you used to register the software, while you can find your OpenAI API key here (you will have to be logged in)
- At this point the program will ask you how to set up your command keys. We recommend the default settings or reading the instructions carefully to set new command keys
- 6. That’s it, you’re ready to go!
How to Download and Install ZimmWriter for Mac OS
#1 – Install Brew and Wineskin Winery
Installing Brew:
- Go to https://brew.sh and copy the command to install Brew.
- Paste into the terminal and execute. If prompted for password, enter your Mac password. The cursor doesn’t move as you input your password, but input it anyway and then press ‘return’ on your keyboard. Wait until it’s done.
- [Skip this step if the installation is successful] If you see the message below, follow the instruction to finish installation of brew. There are 2 lines starting with ‘echo’ and one line starting with ‘eval. Copy, paste, and execute one by one.
Installing WineSkin:
- Copy and paste the following command into the terminal:
- brew install –cask –no-quarantine gcenx/wine/unofficial-wineskin
- (website here: https://github.com/Gcenx/WineskinServer)
Setup Wineskin Winery:
- Open Wineskin Winery in Launchpad (F4) or the Application Folder.
- Press the ‘Update’ button if clickable.
- Press the ‘+’ button and the ‘Add Engine’ window will open.
- From the dropdown, choose the latest version (currently it’s WS11WineCX64Bit22.0.1-1), then press ‘Download and Install’ and ‘Ok’.
- Wait until it’s done downloading, the download window will close automatically.
#2 – Download and extract Zimmwriter
Safari on Mac OS automatically extracts the downloaded file to a folder called ‘zimmwriter’ in the Downloads folder.
#3 – Create a Mac app for Zimmwriter:
- In Wineskin Winery, press “Create New Blank Wrapper”.
- Choose a name for the wrapper e.g. Zimmwriter5.72 , then press ‘Ok’.
- Wait until it’s done in a few minutes. It may look frozen but it’s not. If any error pops up, just click cancel.
- When done, click on “View wrapper in Finder’. Alternatively, press F4 to open Launchpad and your new app will show up at the last page.
- Double click it, and press “Install Software”, then either “Copy a Folder inside” or “Move a Folder inside”.
- Browse to where you extracted Zimmwriter, and choose the Folder (not the files inside). Click ‘Choose’.
- Choose Executable: From the dropdown, choose the path that ends with ‘AutoIt3_x64.exe’, then press ‘Ok’.
- Press Quit.
#4- Run your Zimmwriter Mac app:
- Press F4 to open Launchpad, your new app should be at the last page.
- Sometimes it may take up to 30 seconds to show up. Just wait for it. A blue icon will appear on the menu bar.
- When asked for permission, press ‘Ok’. This is only done once.
- Press the green up arrow button until you see ‘zimmwriter.a3x’.
- Click that file and press ‘Open’. You will need to do this every time you run Zimmwriter.
- Set up Zimmwriter as normal (input your email and license key). This is only done once.
- Set up trigger buttons with CTRL+SHIFT for less interference with other apps.
- Change the output path to any other location of your choice. You can do this from Zimmwriter’s option menu. It’s recommended not to use the default file output path. By default, the output folder is inside the app. Any files within the app will be deleted when you delete the App.
#5 How to Uninstall Zimmwriter From Mac:
- In the Finder app, go to the Applications folder
- In the Search field near the top right of the Finder window, type ‘wineskin’.
- When you see a folder named ‘Wineskin’, double click on it.
- You will see a list of apps (wrappers) you made with Wineskin.
- Drag the app you want to uninstall to Trash.
Installation instruction credit goes to: Wilson Tjandra
Conclusion About ZimWriter
If you’ve made it this far, I’ve managed to hold your attention in hopes of providing you with what should be one of the most frequently used tools in your bag for 2023! ZimmWriter is a great option for those looking for robust, long-form content production at scale – if that is not your goal, we recommend heading over to Jasper AI to continue fighting with their prompts.
All in all we believe this tool has the capacity to re-shape your SEO processes, allow you to help more clients or your own projects, and develop content in ways that are only limited by the extent of your imagination and how you choose to provide prompts!
Want to learn more about ZimmWriter Windows? Head over to Matt’s Facebook group and get answers to all your questions! Note, Matt is incredibly responsive to all inquiries!
Want to learn more about ZimmWriter using a comprehensive training course with videos? We recommend this ZimmWriter Training Course!
Frequently Asked Questions About ZimmWriter
Can ZimmWriter Be Used on Mac OS?
While there is no official support currently for ZimmWriter on Mac machines, users have reported being able to launch and use ZimmWriter on Parallels, a desktop application that allows you to run Windows! With no current plans for official support in the works, we recommend buying the cheapest Windows laptop you can find from Best Buy to make sure that all future patches are compatible with your machine and operating system!
How much does it cost to create content with ZimmWriter?
The cost to create content with ZimmWriter varies from 0.1c to 0.20c depending on which tool you are using inside of the program it’s self. For short magic key commands the cost of content creation is much cheaper than using the Bulk Blog Writer, for example!
Note: When setting up an OpenAI account and connecting it to ZimmWriter, you get $18 of Free Credits from OpenAI that can bused in conjunction with ZimmWriter!
Can ZimmWriter pass AI detection?
In our experience when the following selections are ticked, ZimmWriter can pass AI Detection with ease. Those selections include: Personal or Very Personal Voice, Literaary Devices, Tease, and Boost Chance of Detection As Real!
Can I change the OpenAI API Key in ZimmWriter?
Yes, to change the OpenAI API Key in ZimmWriter, simply opten the options menu and select “Set New OpenAI API Key”!
ZimmWriter is giving me an error message, what do I do?
Depending on the error message ZimmWriter is giving you, this could be due to many reasons! Follow these steps to troubleshoot:
- Restart the program
- Check OpenAI’s Status Website to make sure they are not experiencing an outage
- Make sure your OpenAI API Key is entered correctly
- Try heading over to the ZimmWriter Facebook Group to see if anyone else is experiencing the same issue and what the fix could be
Is Chat GPT and ZimmWriter the same thing?
Often confused, Chat GPT and ZimmWriter both use OpenAI’s language model to create similar outputs, but they are not the same. Chat GPT is a subscription based service, while ZimmWriter uses OpenAI’s API for a pay-as-you-go cost model


Page Contents
Other Blogs You May Be Interested In


Categories
Leave a Reply